MegaTTS3 是字节跳动开源的一个中英文语音克隆项目,效果相当不错。然而,官方的安装文档有些简略,尤其是在 Windows 系统上,许多用户反映安装困难。本教程旨在帮助大家解决这些问题,顺利在 Windows 上安装并使用 MegaTTS3。
开始之前,我们先来了解几个教程中会用到的基本概念:
- CMD 控制台 (命令提示符):
- 如何打开:在你想要操作的文件夹(比如
D:/python/megatts3)的地址栏里,删掉原来的路径,输入cmd三个字母,然后按回车键。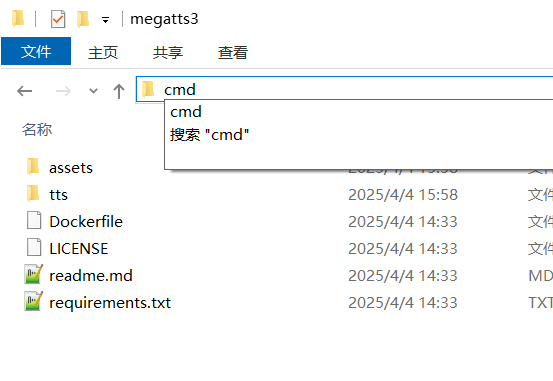
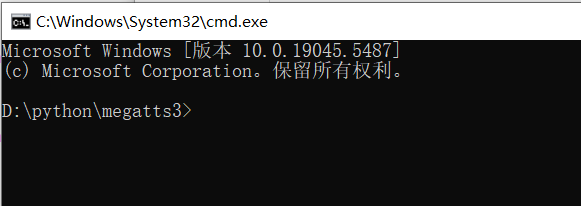
- 作用:会弹出一个黑色的窗口,这就是 CMD 控制台。本教程中提到的所有 命令 都在这里输入并按回车执行。
- 如何打开:在你想要操作的文件夹(比如
- 执行命令:
- 在 CMD 控制台里输入一行指定的文本(即“命令”),然后按下回车键。
首次安装与配置
强烈建议:在 Windows 系统下使用
Miniconda来部署 MegaTTS3,这能避免很多不必要的麻烦。以下教程均基于Miniconda。 示例路径:本教程假设你的工作目录(安装 MegaTTS3 的地方)是D:/python/megatts3。如果你的路径不同,请相应修改命令中的路径。
步骤一:安装 Miniconda
下载 Miniconda:
- 用浏览器访问:
https://www.anaconda.com/download/success#miniconda - 找到页面中的
Miniconda Installers部分,点击下载链接。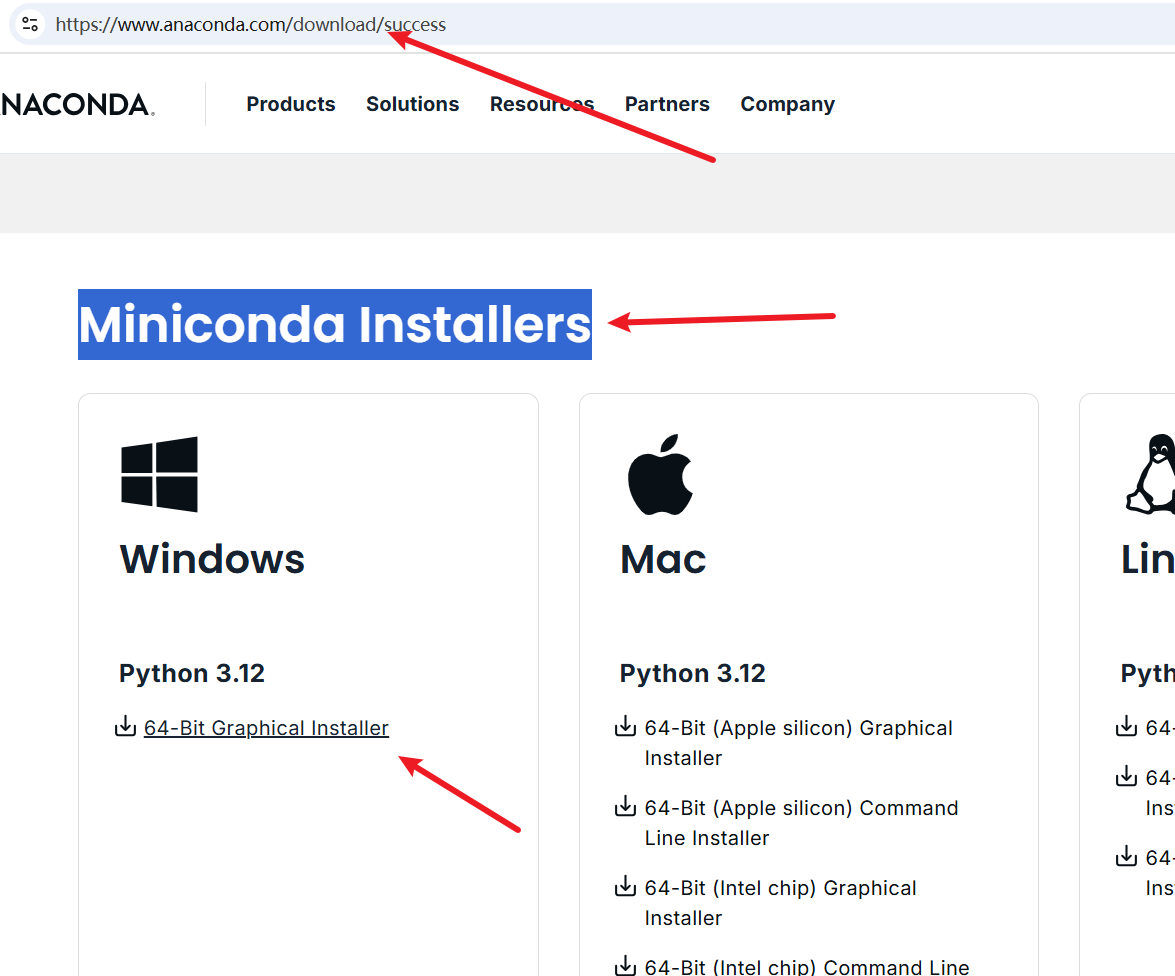
- 用浏览器访问:
安装 Miniconda:
- 双击下载好的
.exe安装文件。 - 一路点击
Next,在许可协议页面点击I Agree。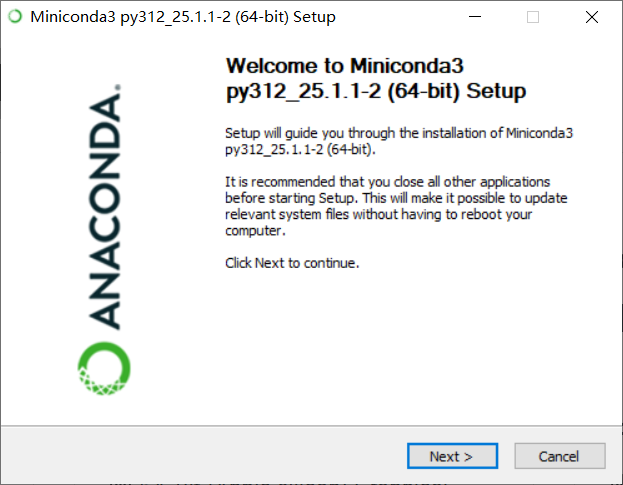
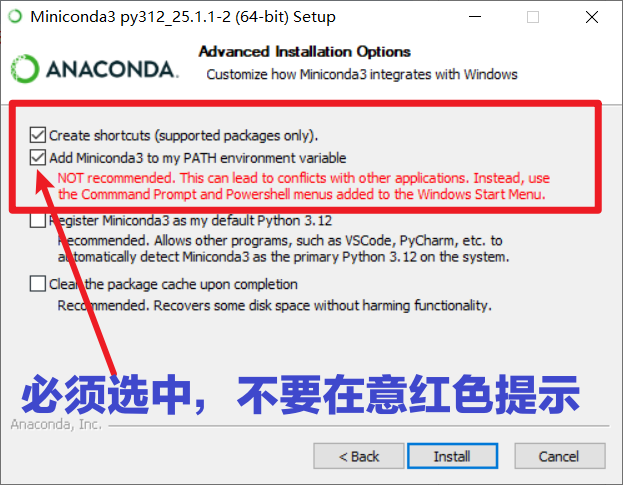
- 关键步骤:在选择安装选项时,务必勾选第二个复选框 "Add Miniconda3 to my PATH environment variable"。不用理会它旁边的红色警告文字,请务必勾选。
- 继续点击
Next或Install直至安装完成。
- 双击下载好的
步骤二:下载 MegaTTS3 源代码
访问官方仓库:
- 打开网址
https://github.com/bytedance/MegaTTS3
- 打开网址
下载代码:
- 点击绿色的
<>Code按钮,然后选择Download ZIP。 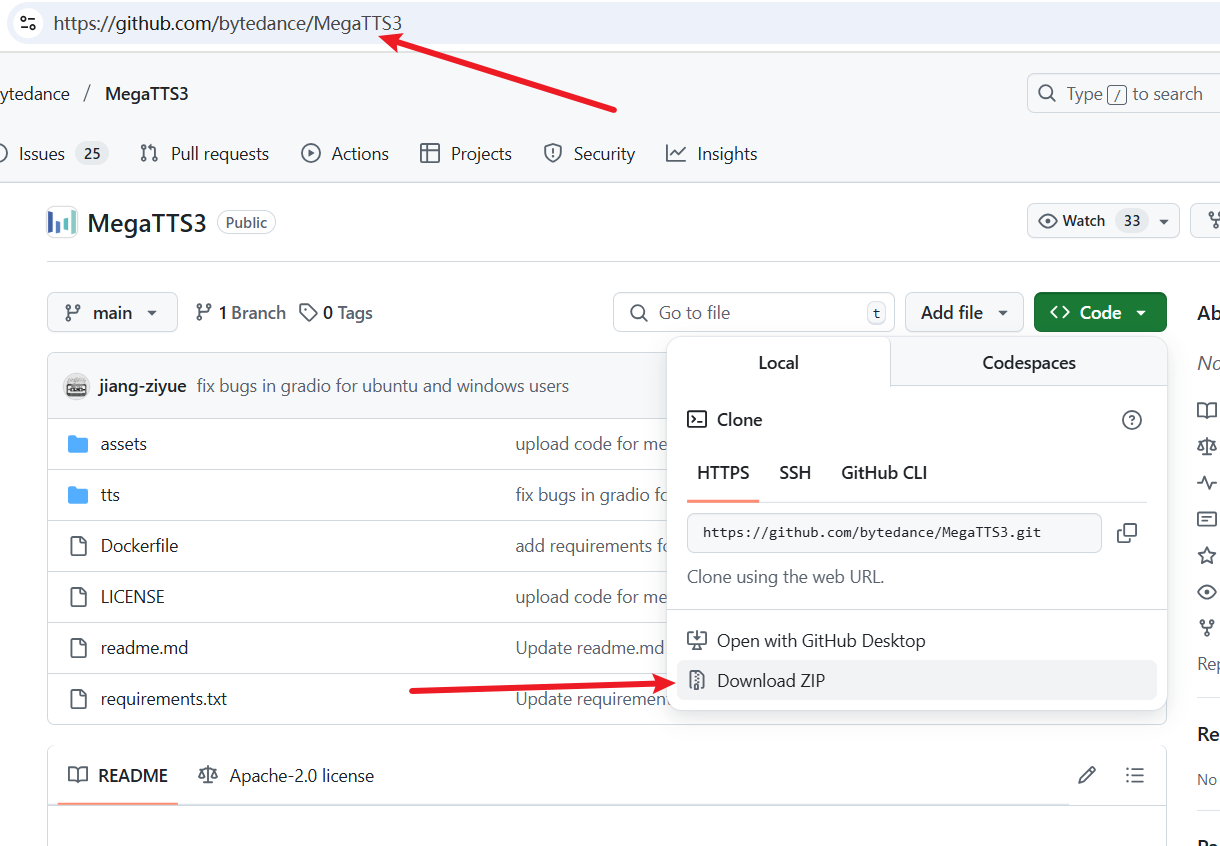
- 点击绿色的
解压并放置文件:
- 解压下载的
MegaTTS3-main.zip文件。 - 将解压后
MegaTTS3-main文件夹 里面 的所有文件和子文件夹,全部复制 到你准备好的工作目录,例如D:/python/megatts3。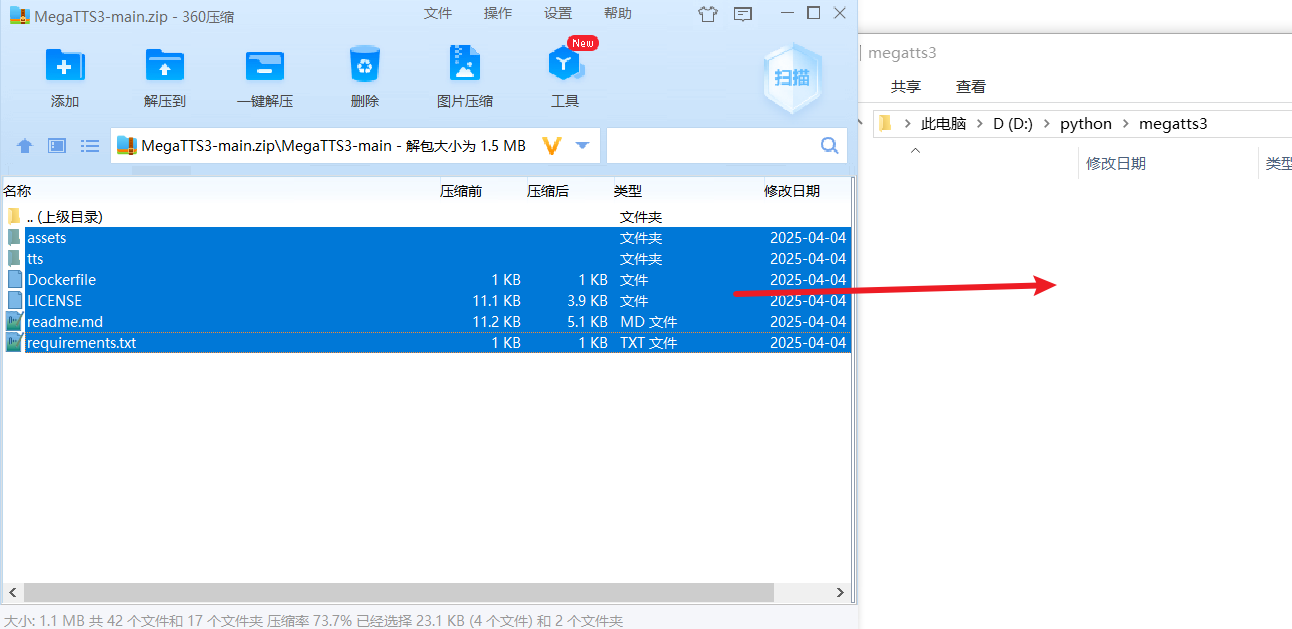
- 复制完成后,
D:/python/megatts3文件夹内应包含assets,checkpoints,tts文件夹等。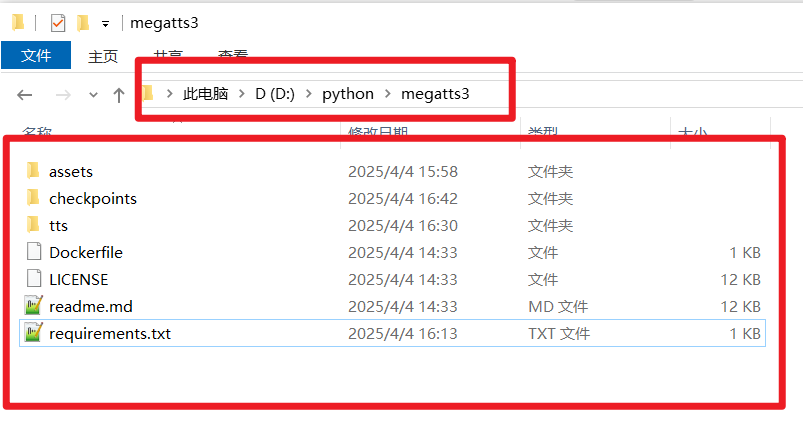
- 解压下载的
步骤三:创建并激活虚拟环境
打开 CMD 控制台:
- 进入你的工作目录
D:/python/megatts3。 - 在地址栏输入
cmd并回车。
- 进入你的工作目录
创建虚拟环境:
- 在 CMD 控制台输入以下命令,创建一个名为
megatts3env且使用 Python 3.10 的环境:
- 在 CMD 控制台输入以下命令,创建一个名为
conda create -n megatts3env python=3.10 安装过程中,如果提示
 Proceed ([y]/n)?,输入 y 然后按回车。 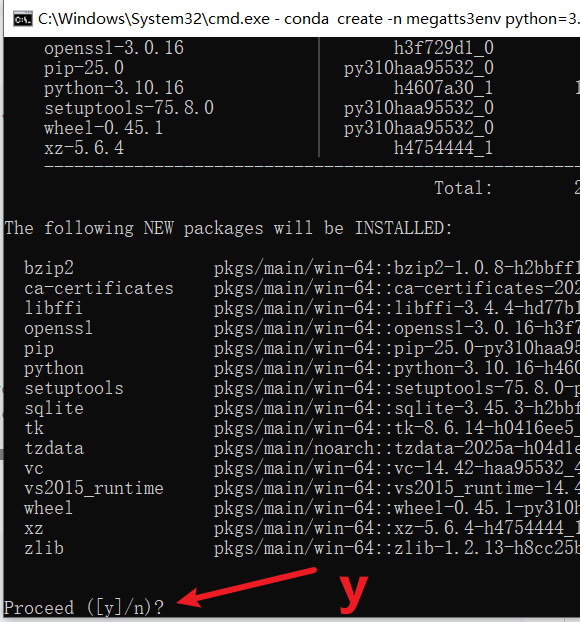
- 激活虚拟环境:
- 创建完成后,输入以下命令激活环境(以后每次运行 MegaTTS3 前都需要执行此步骤激活虚拟环境):
conda activate megatts3env
激活成功后,命令行提示符前会显示 (megatts3env)字样。

注意:以下所有安装和运行命令,都必须在已激活 (megatts3env) 环境的 CMD 控制台中执行!
步骤四:安装依赖库
特别注意:直接按照官方仓库文档在 Windows 上安装通常会失败。请务必严格按照以下顺序执行命令。
安装 pynini:
- 在 已激活 的 CMD 控制台中输入并执行:bash
conda install -y -c conda-forge pynini==2.1.5 - 等待命令执行完成。
- 在 已激活 的 CMD 控制台中输入并执行:
安装 WeTextProcessing 1.0.3:
- 继续在 CMD 控制台中输入并执行:bash
pip install WeTextProcessing==1.0.3 - 等待命令执行完成。
- 继续在 CMD 控制台中输入并执行:
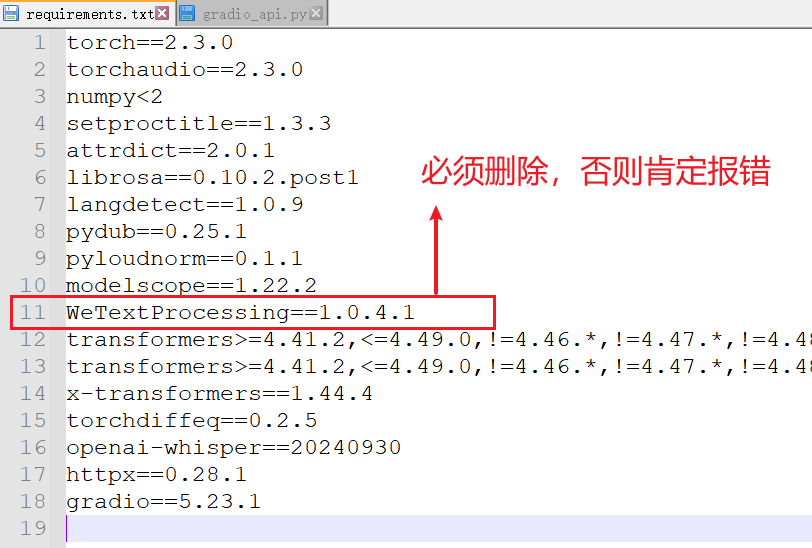
修改 requirements.txt 并安装剩余依赖:
- 用记事本或其他文本编辑器打开工作目录 (
D:/python/megatts3) 下的requirements.txt文件。 - 找到并 删除 包含
WeTextProcessing==1.0.4.1的那一行。 - 保存并关闭文件。
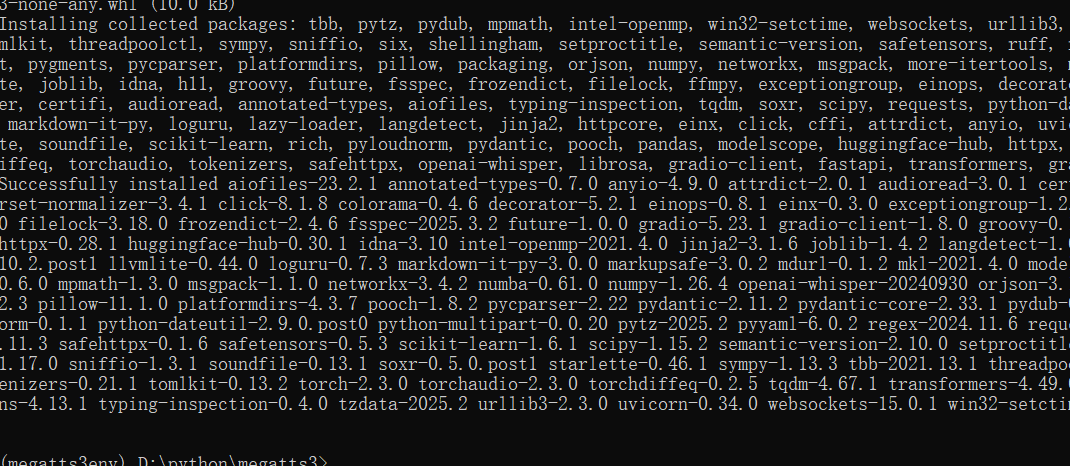
- 回到 CMD 控制台,执行以下命令来安装其余的依赖项:bash
pip install -r requirements.txt
- 用记事本或其他文本编辑器打开工作目录 (
- 设置环境变量:
- 将下面这行命令完整复制粘贴到 CMD 控制台,然后按回车执行。注意:如果你安装目录不是
D:/python/megatts3,请修改命令中的路径为你自己的实际路径。bashconda env config vars set PYTHONPATH="D:/python/megatts3;%PYTHONPATH%" - 设置成功后,你需要 关闭当前 CMD 窗口,然后重新打开一个新的 CMD 窗口,并重新激活环境
conda activate megatts3env,这样环境变量才会生效。
- 将下面这行命令完整复制粘贴到 CMD 控制台,然后按回车执行。注意:如果你安装目录不是
检查:如果以上步骤均未报错(忽略一些黄颜色警告信息 WARN),则依赖环境安装成功。如果遇到红色报错,请仔细检查是否严格按照顺序执行,特别是是否正确修改了 requirements.txt 文件。
步骤五:下载预训练模型
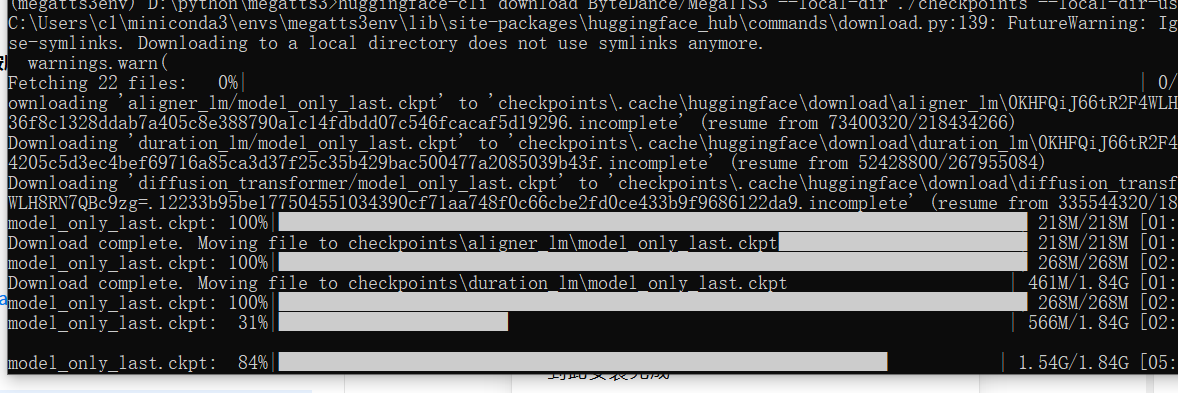
提示:模型文件托管在 Hugging Face Hub,国内访问无法访问,必须科学上网。
- 再次确保你的 CMD 控制台处于 已激活
(megatts3env)状态。 - 执行以下命令下载模型文件到工作目录下的
checkpoints文件夹:bashhuggingface-cli download ByteDance/MegaTTS3 --local-dir ./checkpoints --local-dir-use-symlinks False - 耐心等待下载完成。
步骤六:(可选) 添加 GPU 加速支持
如果你的电脑配备了 NVIDIA 显卡,并且已经安装了 CUDA 12.x 版本,可以通过安装 GPU 版本来加速语音合成。
- 确保 CMD 控制台已激活
(megatts3env)。 - 执行以下命令:
pip install --force-reinstall torch torchvision torchaudio --index-url https://download.pytorch.org/whl/cu126到这里,所有的安装和配置工作就完成了!
启动 MegaTTS3 Web 服务
每次你想使用 MegaTTS3 时,都需要按以下步骤启动。
打开 CMD 控制台:
- 进入你的 MegaTTS3 工作目录 (例如
D:/python/megatts3)。 - 在地址栏输入
cmd并回车。
- 进入你的 MegaTTS3 工作目录 (例如
激活虚拟环境:
- 执行命令:
conda activate megatts3env
- 执行命令:
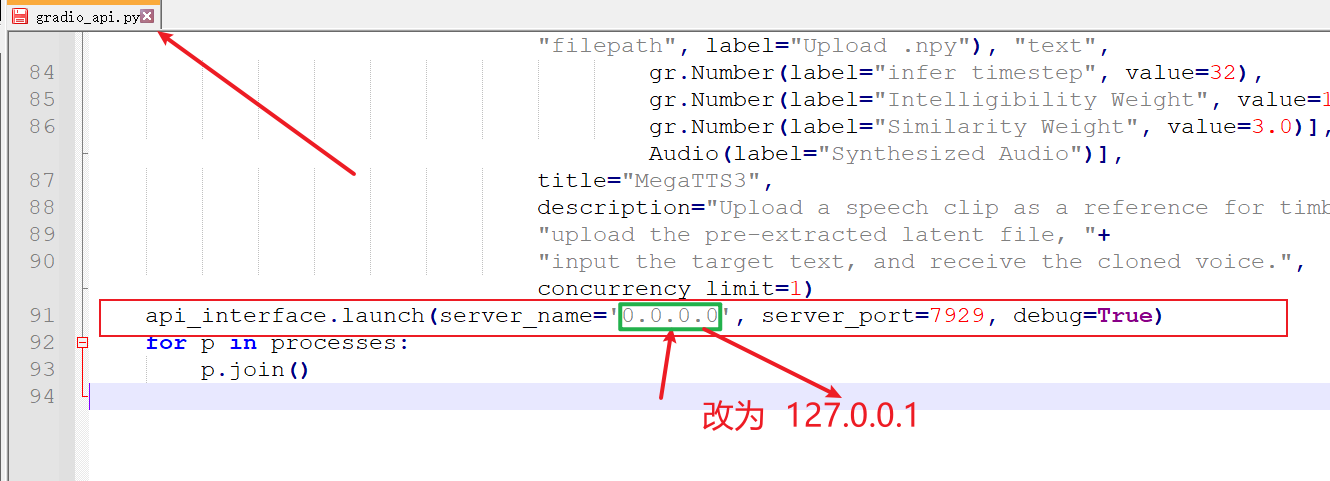
(建议) 修改 Gradio 监听地址:
- 首次启动前强烈建议执行此步骤:用代码编辑器或记事本打开文件
D:\python\megatts3\tts\gradio_api.py - 滚动到文件末尾,找到
server_name="0.0.0.0"修改为server_name="127.0.0.1"。 - 原因:在 Windows 上使用
0.0.0.0可能导致输出大量无关错误信息,甚至启动失败。修改为127.0.0.1通常更稳定。 - 修改后保存文件。
- 首次启动前强烈建议执行此步骤:用代码编辑器或记事本打开文件

- 启动程序:
- 在已激活的 CMD 控制台中执行:bash
python tts/gradio_api.py
- 在已激活的 CMD 控制台中执行:
- 如果启动成功,你会在 CMD 控制台中看到类似下面的输出,提示服务正在运行:

访问 Web 界面:
- 在你的浏览器中打开这个地址
http://127.0.0.1:7929。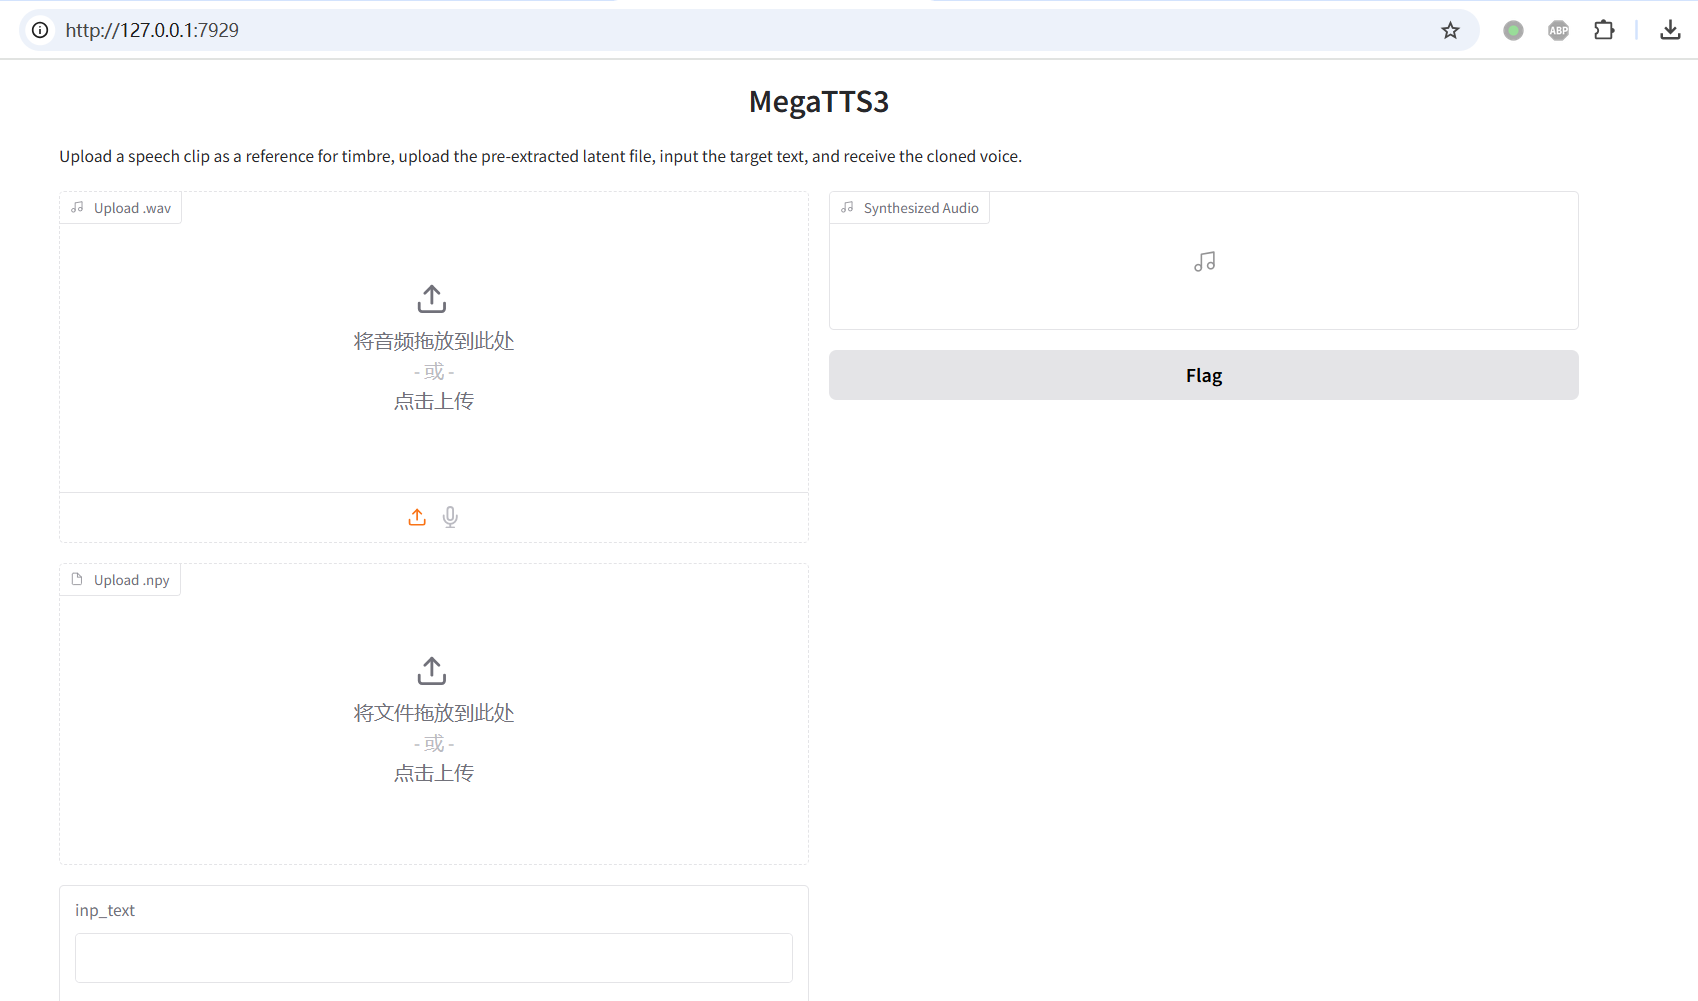
- 在你的浏览器中打开这个地址
使用 MegaTTS3 进行语音克隆
理解音色来源
MegaTTS3 目前是一个 “半开源” 项目。这意味着你 不能 克隆任意你提供的声音样本。你 只能 使用字节跳动官方预先处理并公布在特定页面的音色(latents)。
- 官方解释:这样做是出于安全和法律法规的考虑。
- 如果想克隆自己的声音:你需要按照官方指定的方式提交你的音频,等待他们审核通过并放在 Latents 页面后,才能下载使用。(具体方法见下文)
下载可用的音色文件
访问 Google Drive 文件夹:
- 你需要科学上网访问 Google 服务并拥有一个Google账号(若没有可免费注册)。
- 打开网址(即latens页面):
https://drive.google.com/drive/folders/1QhcHWcy20JfqWjgqZX1YM3I6i9u4oNlr - 这里有三个子文件夹 (
librispeech_testclean_40,official_test_case,user_batch_1-3),包含了所有当前可用的音色。
选择并下载文件:
- 进入任意一个文件夹,浏览里面的
.wav音频文件,试听并选择你想要克隆的音色(wav文件上右键-打开方式-预览,可试听)。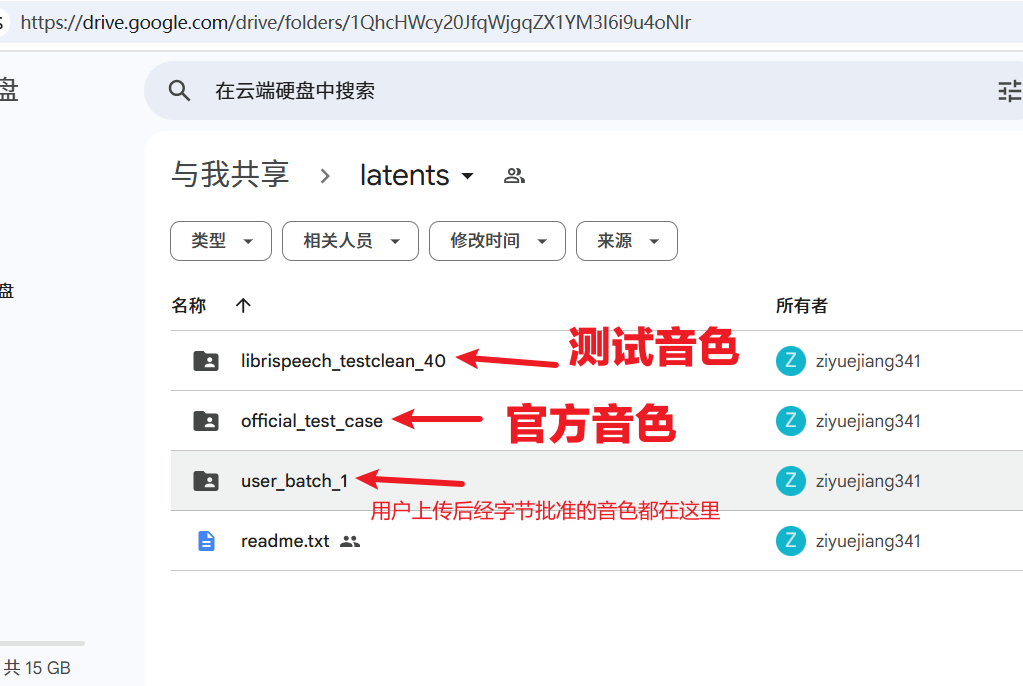
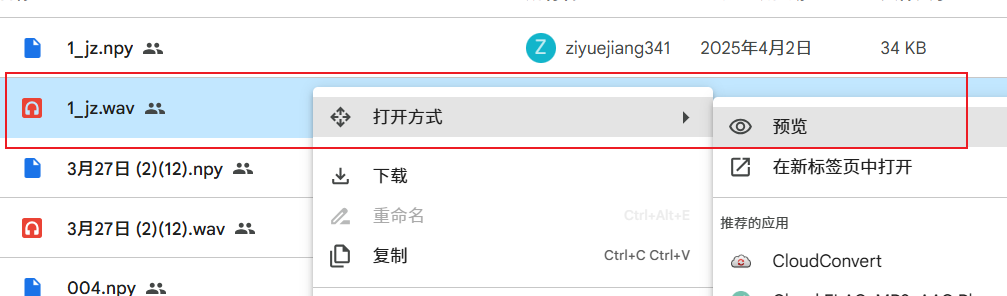
- 重要:当你决定下载某个
.wav文件(例如speaker_xxx.wav)时,必须同时下载同名的.npy文件(即speaker_xxx.npy)。这两个文件是配对使用的,缺一不可。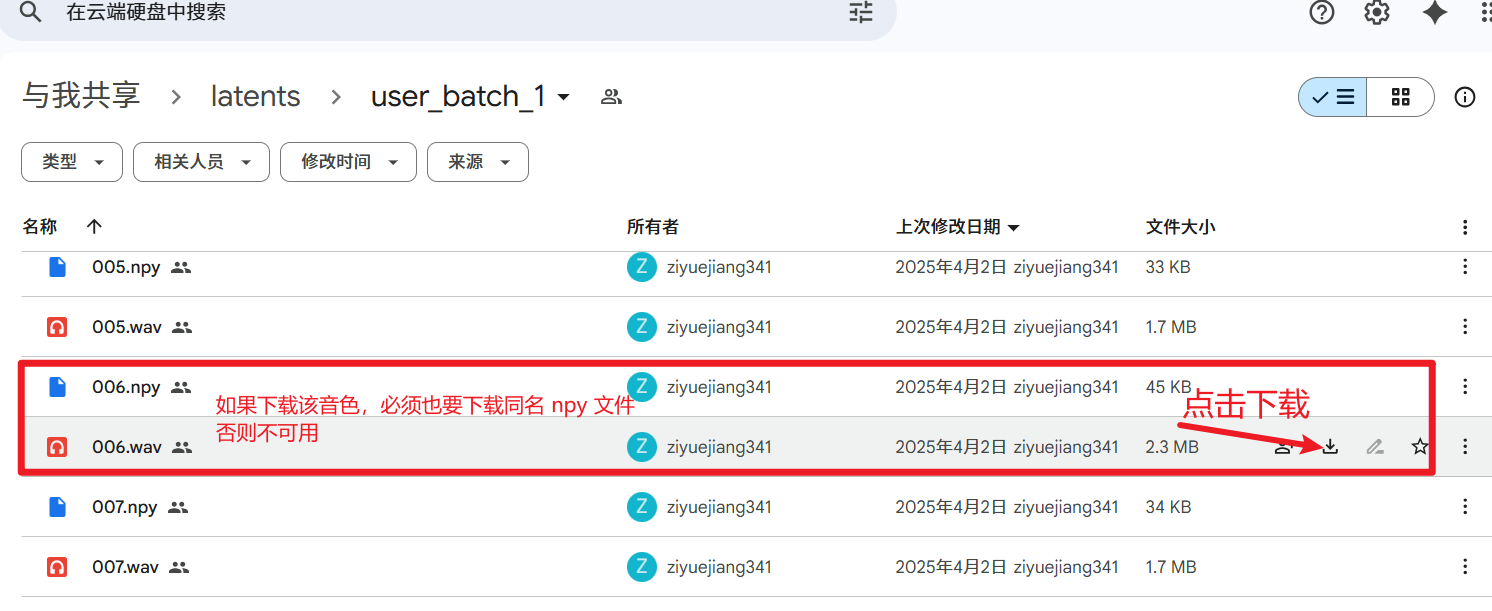
- 将下载好的
.wav和.npy文件保存在你的电脑上。
- 进入任意一个文件夹,浏览里面的
在 Web 界面合成语音
打开 Web 界面:
- 确保 MegaTTS3 服务正在运行,并在浏览器中打开
http://127.0.0.1:7929。
- 确保 MegaTTS3 服务正在运行,并在浏览器中打开
上传音色文件:
- 在页面上找到上传区域。
- 点击 "Upload.wav" 区域,选择你刚才下载的
.wav文件。 - 点击 "Upload.npy" 区域,选择与
.wav文件同名的那个.npy文件。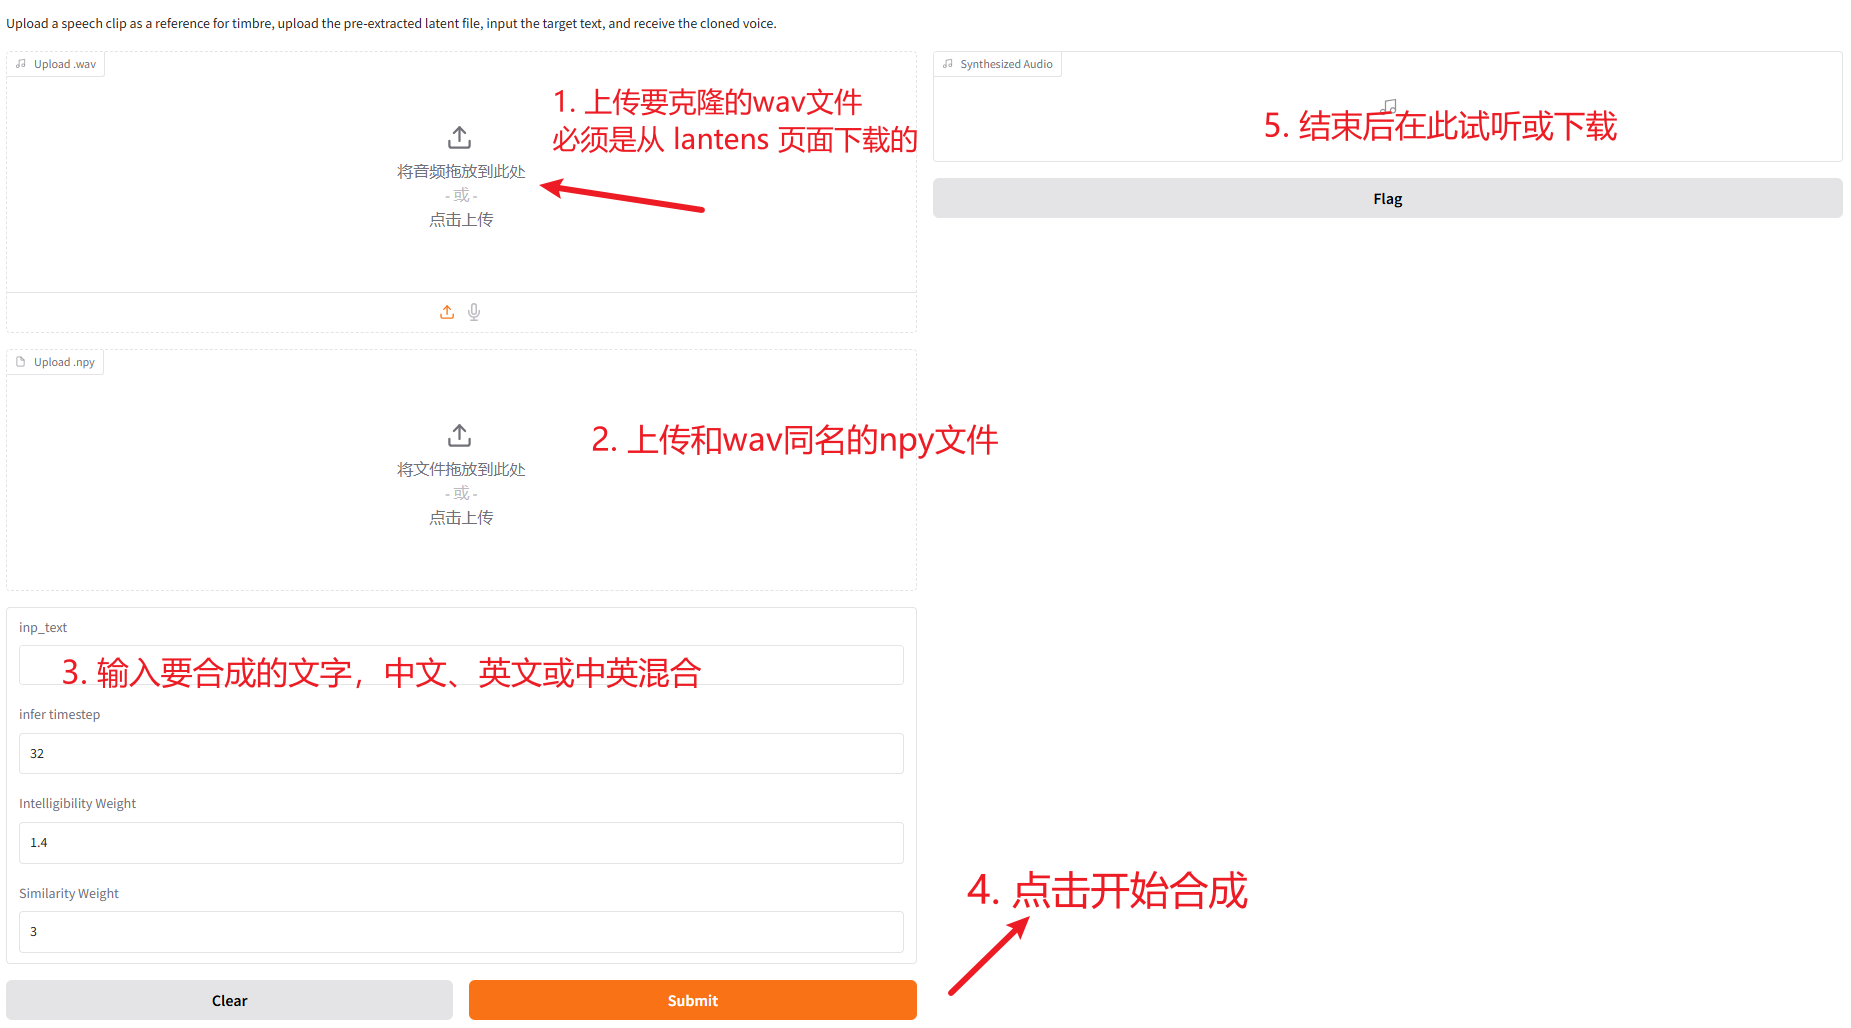
输入文本并合成:
- 在 "Input Text" 输入框中,输入你想要让这个声音朗读的中文或英文文字。
- 点击 "Submit" 按钮执行。
获取结果:
- 等待一小段时间,合成过程会在后台进行。
- 完成后,右上角可以直接播放生成的语音,或者找到下载按钮将其保存为音频文件。
现在你已经成功在 Windows 上安装并使用 MegaTTS3 进行语音克隆了!
上传自己想克隆的音色
如果你希望克隆的音色不存在,可以自行上传
- 首先将你希望克隆音色音频文件,转为wav格式音频,时长不要超过24秒,建议5-24秒内
- 必须保证音频内容合法、不侵犯版权,并且无背景噪声、发音清晰、一个说话人
- 打开该网址
https://drive.google.com/drive/folders/1gCWL1y_2xu9nIFhUX_OW5MbcFuB7J5Cl,将你整理好的wav文件拖拽进去,然后等待审核通过后即可使用了。
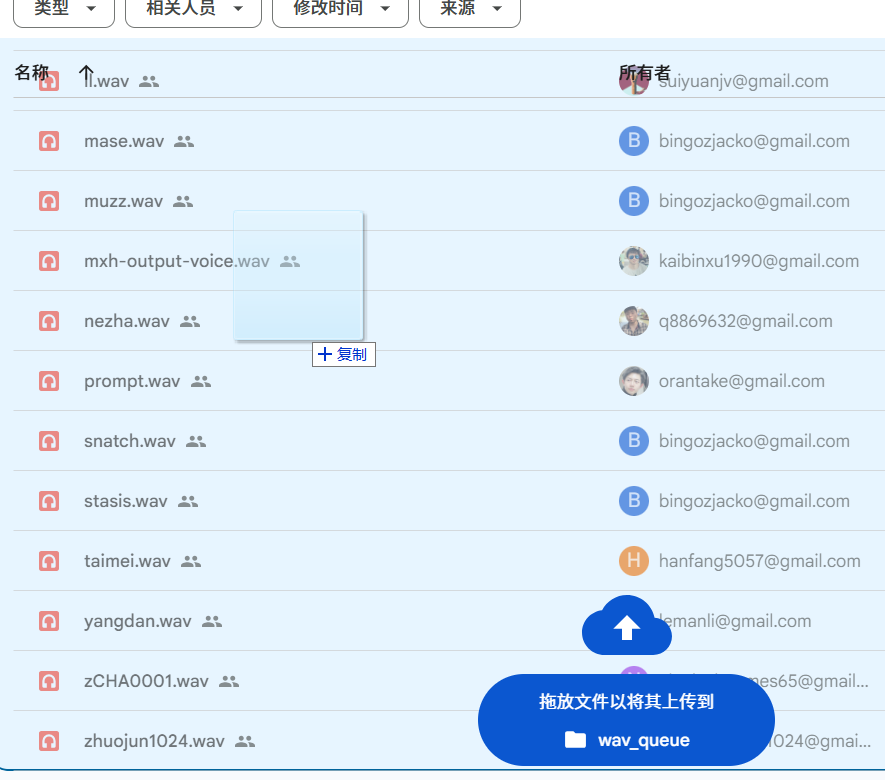
字节审核通过后,会创建同名的npy文件,然后将wav和npy都放进上文所提的
latens页面的user_batch_1-3文件夹内,然后你就可以下载这个wav文件以及同名npy文件来克隆了。