Say Goodbye to CUDA Configuration Nightmares: A Classic "Version Mismatch" Case Study
For anyone using or developing AI tools, configuring NVIDIA CUDA is almost an unavoidable first hurdle. It's powerful, but sometimes a bit "sensitive." A small oversight can lead to hours of troubleshooting.
Today, we'll use a real-world failed installation case to deeply analyze one of the most common "traps" – mismatched NVIDIA driver and CUDA toolkit versions. This will give us a chance to comprehensively review key considerations for CUDA configuration.
Case Analysis: When nvcc and nvidia-smi "Disagree"
Let's look at a typical "accident scene" screenshot:
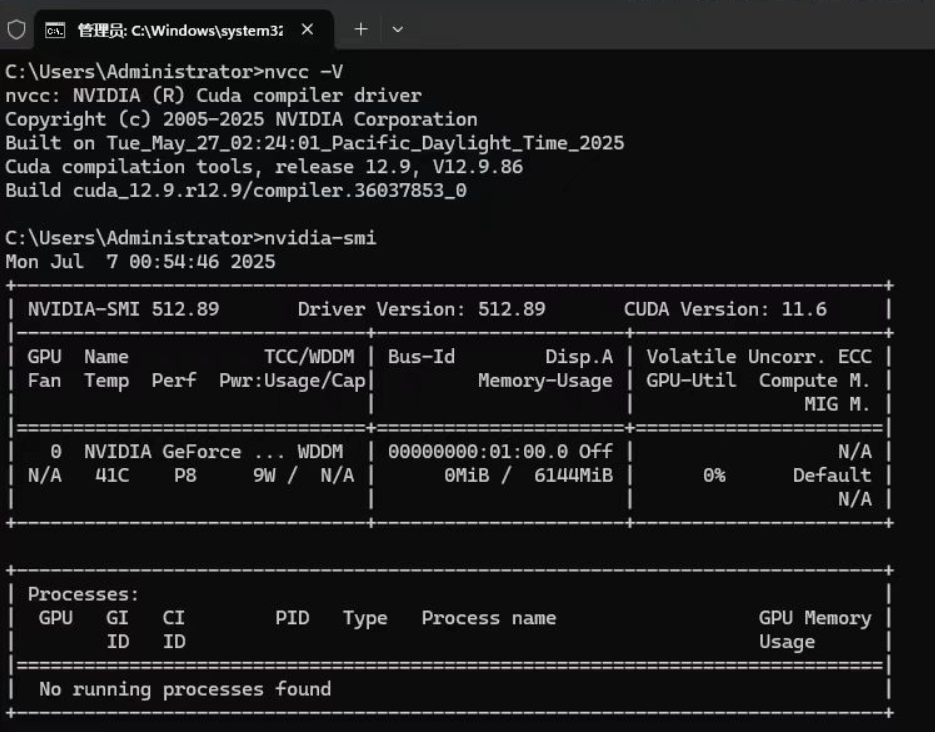
This user executed two critical commands in the command line, but got seemingly contradictory results:
Output of the
nvcc -VcommandC:\Users\Administrator>nvcc -V nvcc: NVIDIA (R) Cuda compiler driver ... Cuda compilation tools, release 12.9, V12.9.86 ...This command tells us that the user installed CUDA Toolkit version 12.9 on their system. The CUDA Toolkit includes compilers (nvcc), development libraries (cuBLAS, cuFFT, etc.), and APIs, and is our "toolbox" for compiling and developing CUDA programs.
Output of the
nvidia-smicommand+-----------------------------------------------------------------------------+ | NVIDIA-SMI 512.89 Driver Version: 512.89 CUDA Version: 11.6 | +-----------------------------------------------------------------------------+This command displays information about the graphics card driver. There are two key pieces of information here:
Driver Version: 512.89: The current system's NVIDIA graphics card driver version is 512.89.CUDA Version: 11.6: This is the most confusing part! The CUDA version here is not the version of the toolkit you installed, but rather the maximum CUDA Runtime version that your current driver (512.89) can support.
The Core of the Problem: A "Generation Gap" Between Driver and Toolkit
Now, let's put the clues together. The problem becomes clear:
You're attempting to use a new toolkit requiring CUDA 12.9 runtime on an old driver environment that only supports CUDA 11.6 runtime.
To put it simply: It's like trying to play a Blu-ray disc with the latest Blu-ray player software (CUDA Toolkit 12.9) on a computer with an old optical drive driver (NVIDIA Driver for 11.6) that only recognizes DVDs. When you click "Play," the system will naturally tell you, "Sorry, I don't recognize this new format."
In practical terms, this means that any program you compile with the CUDA 12.9 toolkit will fail at runtime because it can't find matching driver support, usually throwing a fatal error like CUDA driver version is insufficient for CUDA runtime version.
Solutions: Two Paths, One Optimal Choice
Solution 1: Upgrade the NVIDIA Driver (Highly Recommended)
This is the most direct, correct, and permanent solution. Keeping your driver updated allows you to enjoy the latest performance optimizations, bug fixes, and support for new hardware/software.
- Visit the Official Website: Go to the NVIDIA Official Driver Download Page.
- Select Model: Accurately select your graphics card model (e.g., GeForce RTX 4090), operating system (e.g., Windows 11), and driver type (you can usually choose either Game Ready Driver or Studio Driver).
- Download and Install: Download the latest driver. During installation, it's recommended to select "Custom Installation" and check the "Perform a clean installation" option. This will remove old driver files and avoid potential conflicts.
- Verify Results: After installation, restart your computer. Open the command line again and enter
nvidia-smi. You'll find that theDriver Versionhas been updated, and theCUDA Versionin the upper right corner has also been upgraded to 12.x or higher. Problem solved!
(Typically, the driver version number supporting CUDA 12.x needs to reach 525.xx or higher.)
Solution 2: Downgrade the CUDA Toolkit (Alternative Solution)
In some special cases, such as when your project requires a specific older version of CUDA, or your hardware is no longer supported by the latest drivers, you might consider this solution.
- Uninstall the Current Toolkit: In the system's "Add or Remove Programs," uninstall all components related to CUDA 12.9.
- Download an Older Version: Visit the NVIDIA CUDA Toolkit Archive and find a version compatible with your driver (based on what
nvidia-smidisplays, you can choose 11.6 or lower). - Reinstall: Install the downloaded older version of the CUDA Toolkit.
Thinking Broadly: The Golden Rules of CUDA Configuration
To avoid similar problems in the future, remember the following golden rules:
- Driver First, Toolkit Second: The order of installation is crucial. Always install or update your NVIDIA graphics card driver before installing the CUDA Toolkit.
- Understand the Two "CUDA Versions":
CUDA Versioninnvidia-smi: The maximum CUDA Runtime version that the driver can support, representing the "upper limit of capability."Cuda versioninnvcc -V: The version of the CUDA Toolkit you installed, representing the "current requirement."- Rule: The version number of the former must be greater than or equal to the version number of the latter.
- Check Compatibility: Before installation, you can consult the CUDA Toolkit's Release Notes, which clearly indicate the minimum required driver version.
- Configure Environment Variables Correctly: After installing the CUDA Toolkit, make sure that the system environment variables
CUDA_HOMEandPathare set correctly. The installer usually handles this automatically, but sometimes you need to manually check and modify them to ensure that the system can find commands likenvcc. - Verify Installation: After installation, in addition to running
nvidia-smiandnvcc -V, the best way to verify the installation is to compile and run the CUDA Samples. Go to the installation directory of the CUDA Toolkit (e.g.,C:\Program Files\NVIDIA GPU Computing Toolkit\CUDA\v12.x\extras\demo_suite), and rundeviceQuery.exeandbandwidthTest.exe. If both run successfully and displayResult = PASS, then congratulations, your CUDA environment is ready!