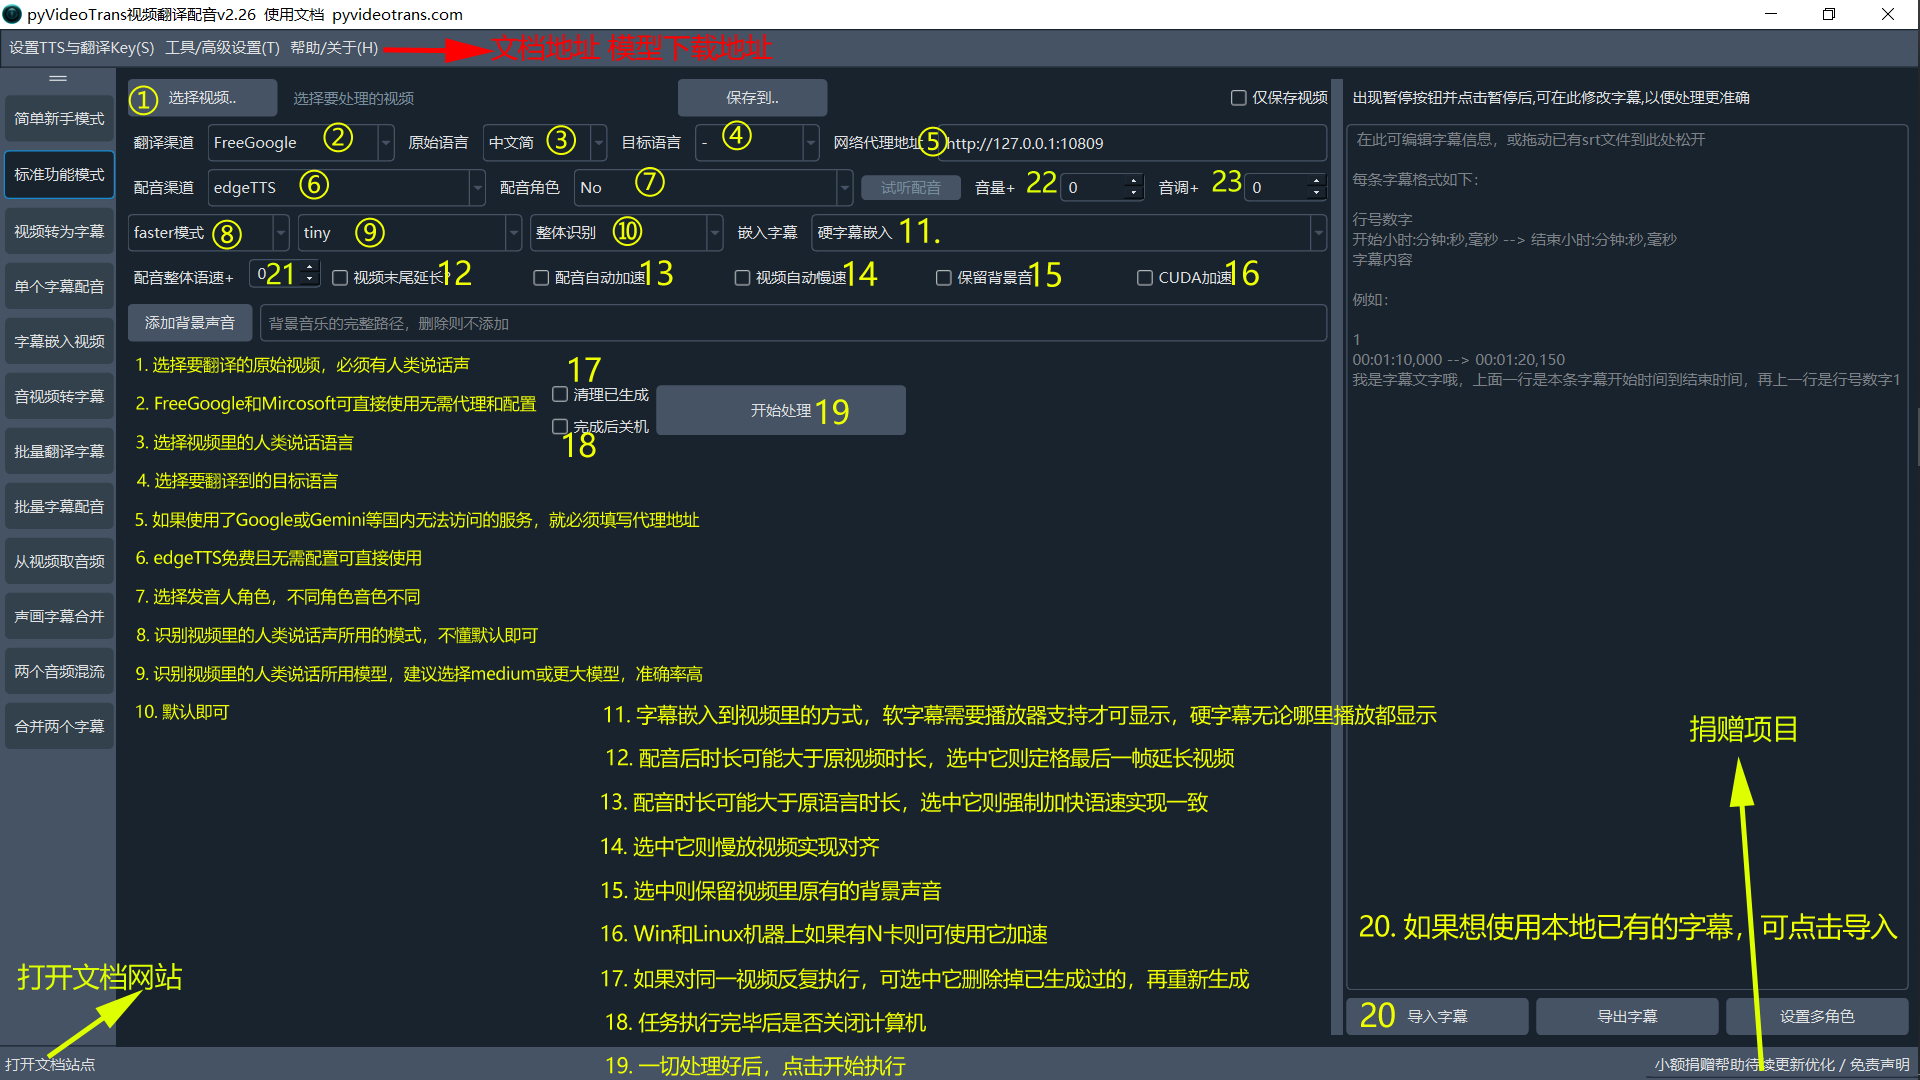
Function and Meaning of Each Option on the Main Interface

As shown in the image above, the functions of each option are as follows:
- Select Video: Choose the original video to be translated. The video must contain clear human speech without excessive noise; otherwise, recognition accuracy may be low. Note that videos without speech are not supported, regardless of whether they have subtitles, as the software works by recognizing human speech to generate subtitles. You can select multiple videos at once by holding the Ctrl key, but the spoken language in all videos must be the same.
- Translation Service: FreeGoogle and Microsoft can be used directly without a proxy or configuration. Other translation services may require a proxy (e.g., Google) or configuration (e.g., Baidu Translate, Tencent Translate). If unsure, it is recommended to choose Microsoft or FreeGoogle.
- Source Language: Select the language spoken in the video. For example, if the speech in the video is in English, choose English here.
- Target Language: Choose the language to translate into. For instance, if you want the video to have Chinese audio and embedded Chinese subtitles, select Simplified Chinese here.
- Proxy Address: If using services like Google or Gemini that are inaccessible in certain regions, you must enter a proxy address. For example, if using a V2Ray software, enter something like
http://127.0.0.1:10809. If you are unfamiliar with proxies, do not fill this in and avoid using services that are inaccessible in your region. - Voice Service: edgeTTS is free and requires no configuration. Other voice services may need setup or installation. If unsure, choose edgeTTS.
- Voice Role: Select the voice role for dubbing. Different roles have different tones. Choose the target language first, then select the role.
- Faster Mode: The mode used to recognize human speech in the video. If unsure, use the default faster mode.
- Tiny: The model used for speech recognition. By default, the tiny model under faster mode is included. It is recommended to choose medium or larger models for higher accuracy. If selecting faster mode or OpenAI mode, additional models must be downloaded to the
modelsfolder in the software directory. Only the tiny model under faster mode is included by default. Other models can be downloaded from: https://github.com/jianchang512/stt/releases/tag/0.0. If you are unsure and just want to try it out, select tiny as it can be used directly without downloading. - Overall Recognition: Leave as default. No changes needed.
- Embed Subtitles: How subtitles are embedded into the video. Soft subtitles require player support to display and won't show on web pages. Hard subtitles are displayed everywhere, including web pages.
- Extend Video End: Dubbing may take longer than the original video. Check this to extend the video by 10ms at the end until the dubbing finishes. Recommended to check.
- Auto Speed Up Dubbing: Dubbing duration may exceed the original speech duration. Check this to automatically speed up the dubbing to match, with the maximum speed adjustable in the menu under Tools/Advanced Settings.
- Auto Slow Down Video: Check this to slow down the video to align with the audio and subtitles. The slowdown rate can also be controlled in the advanced settings menu.
- Keep Background Audio: Check to retain the original background sounds in the video, such as background music. If checked, processing will be slower, especially for larger videos.
- CUDA Acceleration: Use this to speed up processing on Windows or Linux machines with NVIDIA GPUs. Requires CUDA environment installation. Tutorial available at: https://pyvideotrans.com/gpu.html.
- Clean Generated Files: If processing the same video repeatedly, check this to delete previously generated files before regenerating.
- Shutdown After Completion: Choose whether to shut down the computer after the task finishes.
- Start Processing: Click to begin processing after all settings are configured.
- Import Subtitles: If you want to use existing local subtitles, click to import them. The software will use these subtitles directly instead of performing recognition.
- Overall Dubbing Speed: For example, 10 means the speed is increased by 10% from normal, and -10 means decreased by 10%.
- Volume +: Adjust the volume up or down from the normal level. Only effective with edgeTTS.
- Pitch +: Adjust the pitch up or down from the normal level. Only effective with edgeTTS.
